After completing this lesson, you’ll be able to:
In this lesson, you will:
After completing this lesson, you’ll be able to:
In this lesson, you will:
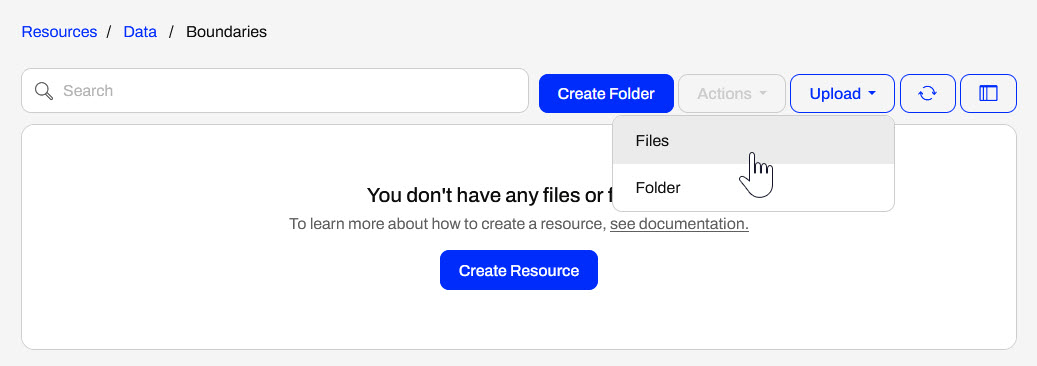
You do not need to publish a workspace to upload data to the FME Flow Resources. Instead, you can upload data directly to Resources from the FME Flow web interface. It's as simple as navigating to your desired folder, selecting upload for files or a folder, and then selecting your data from the file system.
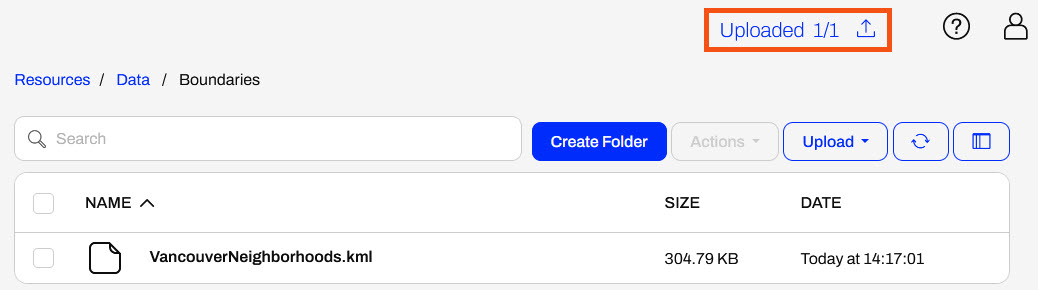
Once FME Flow finishes uploading the file, it will display the count of completed uploads at the top of the page.
In general, uploading files to Resources is very flexible. You may drag a file onto the open Resources folder page to upload. You may also select multiple files to upload at once or a folder containing numerous files. If you have access to the file system on the FME Flow server, you may also upload data directly to the Resources in the FME Flow System Share, located on Windows by default at C:\ProgramData\Safe Software\FMEFlow\resources.
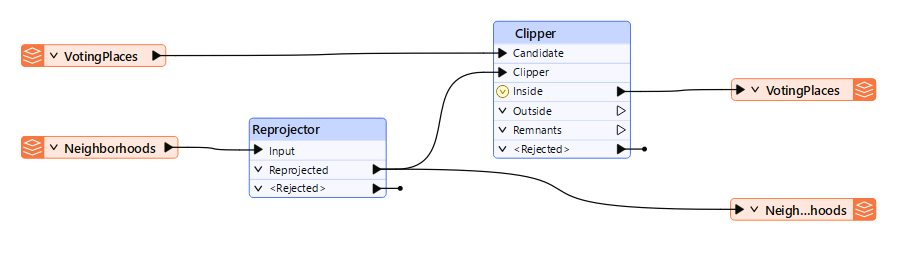
The data you upload to Resources is available to all workspaces and users with permission to access Resources when running workspaces. For example, you use the VancouverNeighborhoods.kml file as source data for multiple workflows, and you only need to store one copy of the file in Resources for multiple workspaces to use.
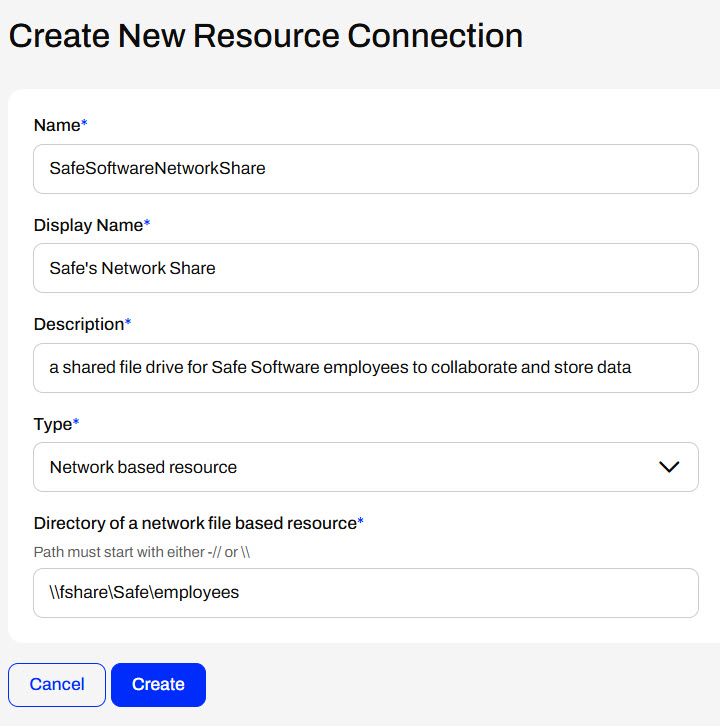
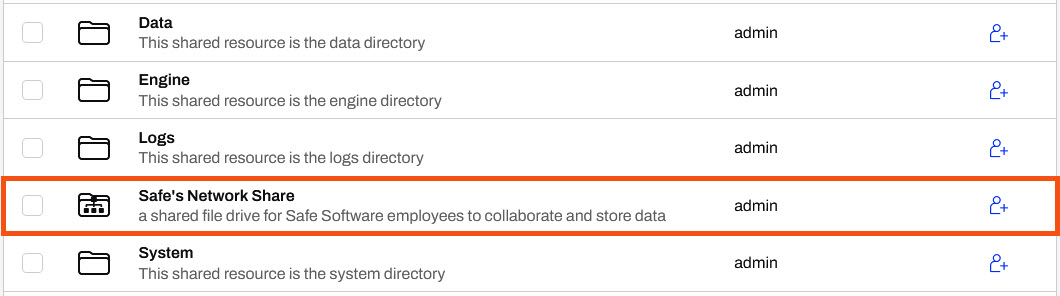
FME Flow can connect to network-based file locations and Amazon S3 file systems via Resource Connections. You create Resource Connections directly from the Resources page on FME Flow.
The FME Flow Service Account needs full permissions to network-based resource drives to access, read, and write to the drive so that FME Flow can connect to and use data from the location successfully. Once you grant permissions to the service account, mapping FME Flow to the network-shared file location is as easy as entering the UNC path to the location.
Once you create a Resource Connection, FME Flow displays it on the Resources page.
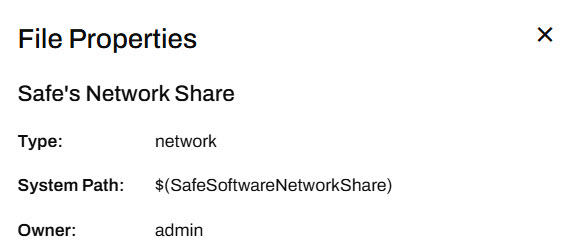
You may also access the Resource Connection's properties like any other Resource item. The System Path is especially useful for referencing the Resource Connection location from workspaces as a parameter.
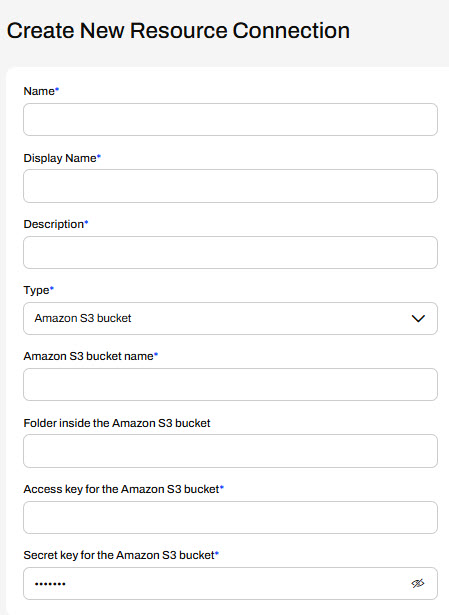
To create an Amazon S3 Resource Connection, you need to enter the bucket name and valid access and secret keys for the S3 location.
Unlike network-based resource systems, you cannot access Amazon S3 Resource Connections from workspaces as a data source or destination using the system path parameter. You must use an S3-related transformer, connector, or URL to access the data stored in the S3 bucket.
Using the FME Flow web interface, selecting data from Resources at run-time is simple with user parameters. However, in some cases, you may want to read data from Resources without the end-user having to select it, or restrict the end-user from selecting alternate source data. You accomplish this using FME Flow parameters, specifically the FME_SHAREDRESOURCE_DATA parameter, which references the Data folder in Resources.
When authoring a workspace to read data from Resources without using a user parameter, you must reference FME_SHAREDRESOURCE_DATA directly in the source file parameter.
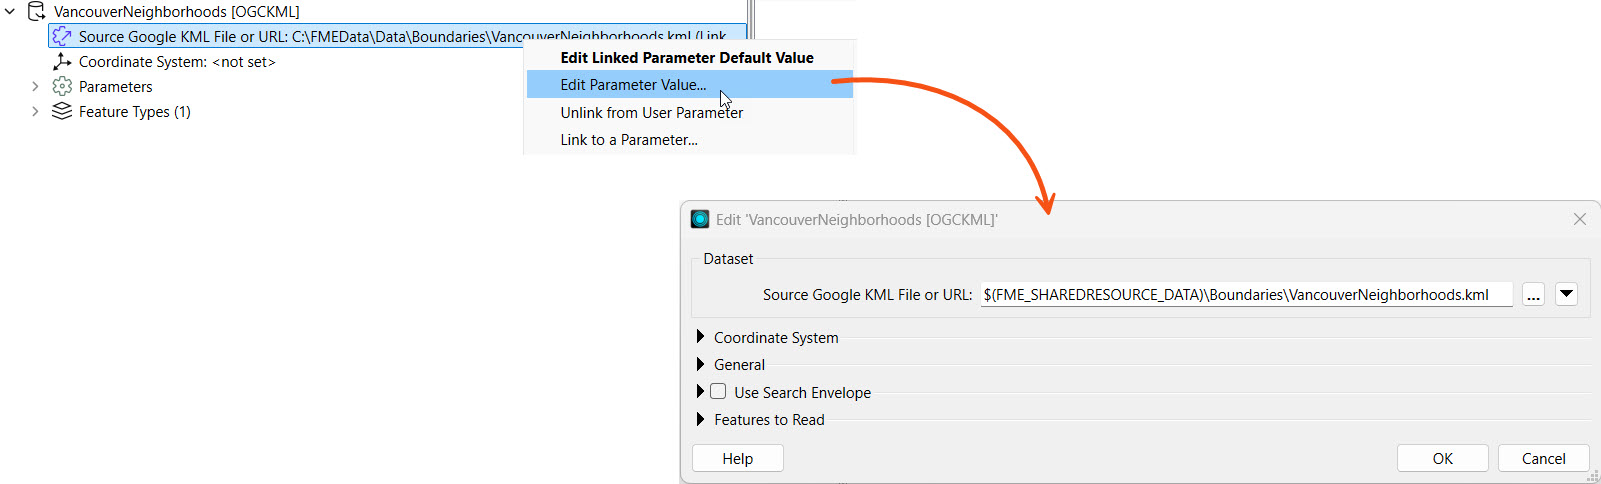
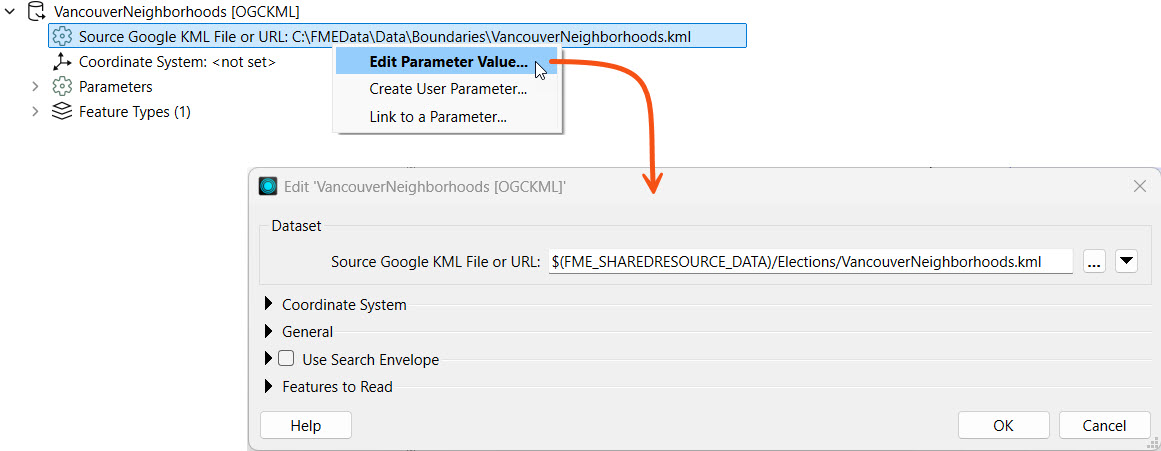
Remember that the Flow parameter FME_SHAREDRESOURCE_DATA includes the Data folder in its path. For example, the source KML file value is FME_SHAREDRESOURCE_DATA\Boundaries\VancouverNeighborhoods.kml not FME_SHAREDRESOURCE_DATA\Data\Boundaries\VancouverNeighborhoods.kml. The easiest way to find the entire path to a Resources dataset is inspecting it's properties on FME Flow and copying the path into the workspace reader parameter.
If you want to prevent end users from altering the source dataset on FME Flow, you must also remove the user parameter for the source file in FME Workbench.
The $(FME_SHAREDRESOURCE_DATA) parameter will fail on FME Workbench unless you set the parameter value to the file server location of the FME Flow System Share. Oftentimes, FME Workbench and FME Flow are not installed on the same machines so FME Workbench cannot directly access the location.

Sven continues with his previous workspace. He wants to store the source data files in FME Flow Resources for storage efficiency and data accessibility across multiple workspaces. However, he just received an updated GML file of voting locations and needs to upload it to Resources. Sven also wants to restrict end users running this workspace from altering the input source files, so he wants to remove the source file user parameter and link directly to the Resources data in the workspace.
For this exercise, follow these steps to help Sven upload the new data and adjust his workspace to use only the Resources data.
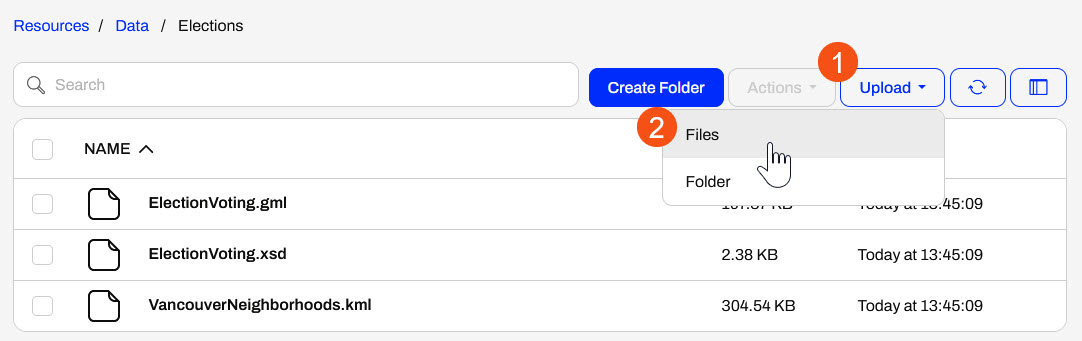
Navigate to Resources> Data > Elections. Here, you will upload the updated GML file of voting locations. Click Upload and select Files.
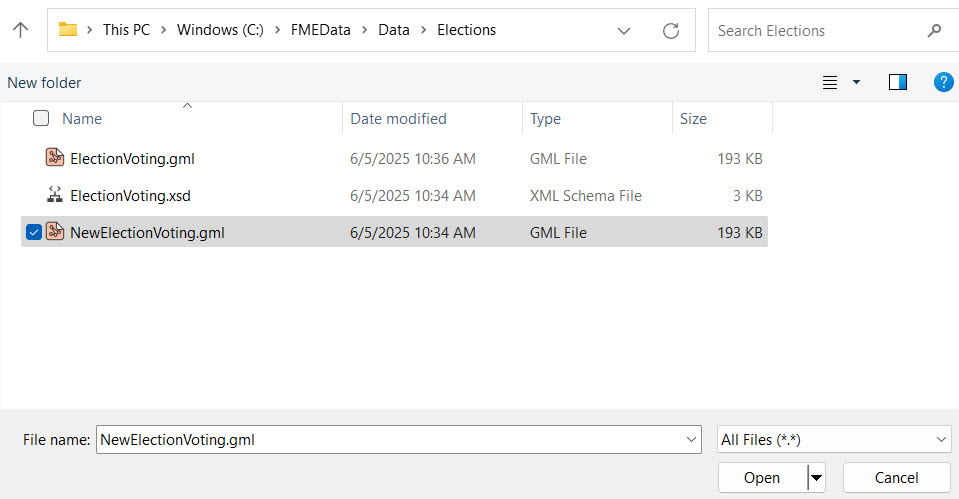
Use the file explorer to navigate to the NewElectionVoting.gml file (C:\FMEData\Data\Elections\NewElectionVoting.gml) and select it for upload to Resources.
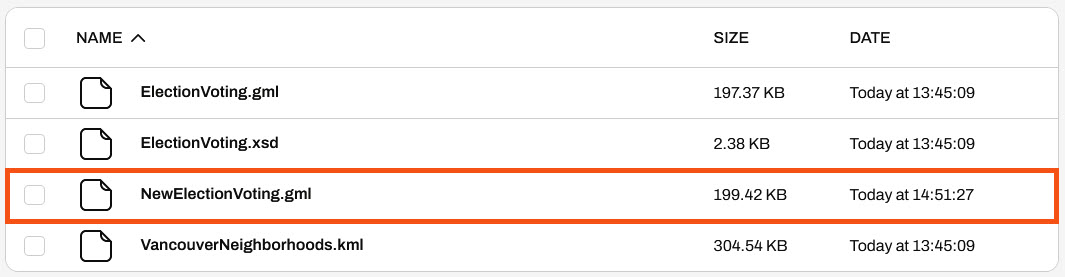
FME Flow adds the NewElectionVoting.gml to the folder, which is ready to use as source data for workspaces.
Return to FME Workbench and open the starting workspace (C:\FMEData\Workspaces\DeployWorkflowsWithFMEFlow\upload-and-use-data-in-resources.fmw).
This is the same starting workspace as the previous lesson, Publish Data to FME Flow Resources. If you already have the workspace open in FME Workbench, you can continue working with it.
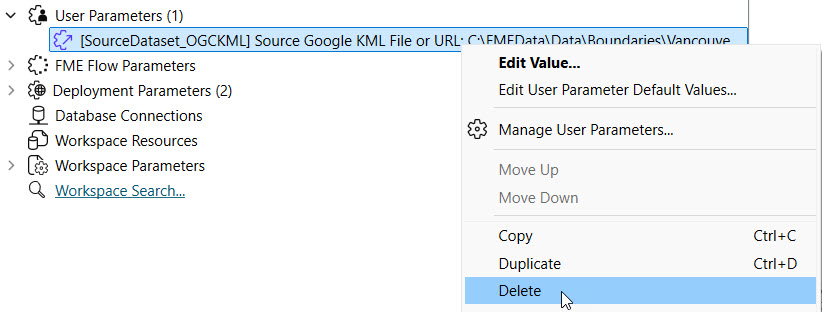
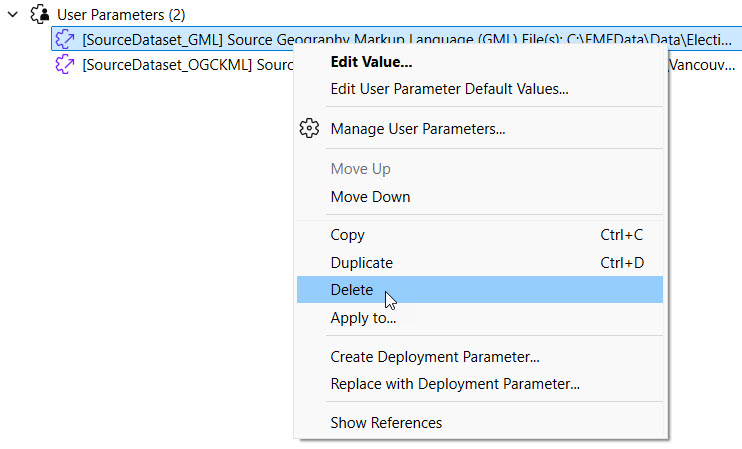
The workspace has two user parameters that take source files as input for the KML and GML readers. Sven doesn't want end users to be able to alter the workspace's source data anymore, so you will remove both user parameters. In the Navigator, expand User Parameters, right-click each parameter, and delete it.
FME Workbench no longer links each source file reader parameter to a user parameter.
Return to the Resource > Data > Elections folder on FME Flow. Select the VancouverNeighborhoods.kml file, open the Actions menu, and select Properties.
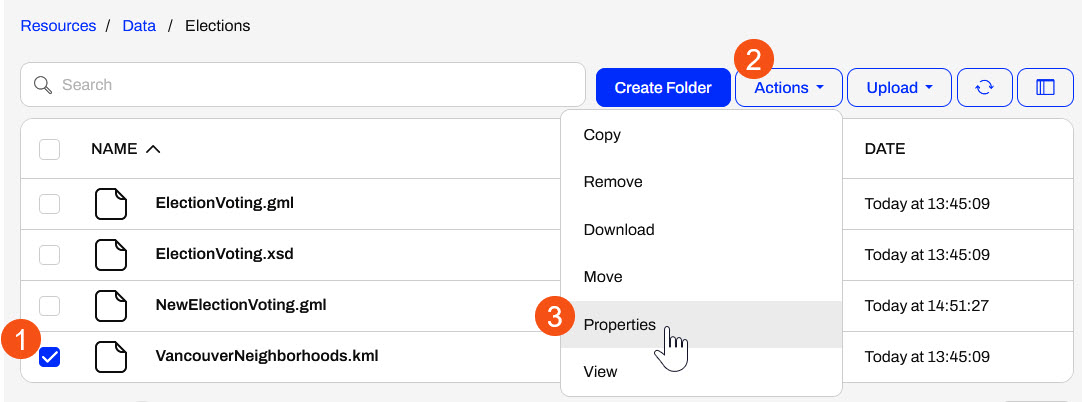
Copy the System Path and click Close.
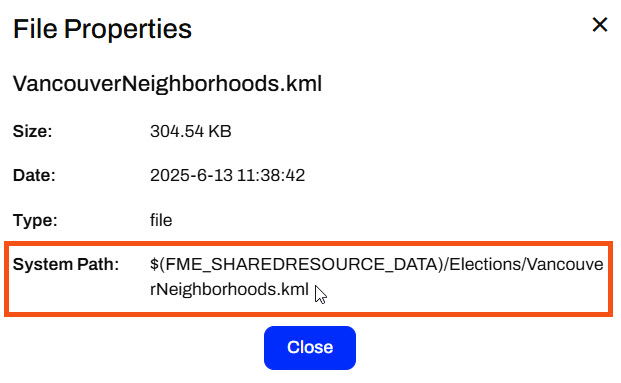
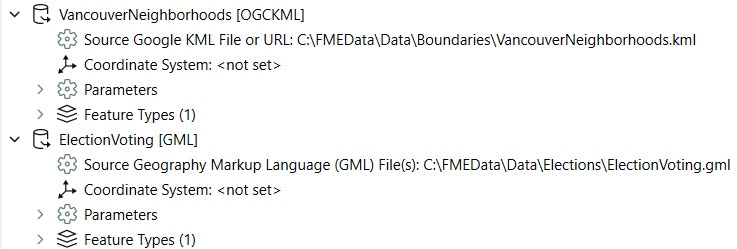
Return to FME Workbench and edit the Source Google KML File or URL parameter for the VancouverNeighborhoods reader. Paste the System Path value for the KML file.
Repeat the same steps to reference the NewElectionsVoting.gml file in the Elections folder. Return to FME Flow, get the System Path for the NewElectionsVoting.gml file, and add it to the Source GML File parameter.

Both source files link to the files stored in Resources > Data > Elections on FME Flow. The $(FME_SHAREDRESOURCE_DATA) parameter denotes this. Neither source file connects to a user parameter, so the end user cannot alter the source file values on FME Flow.
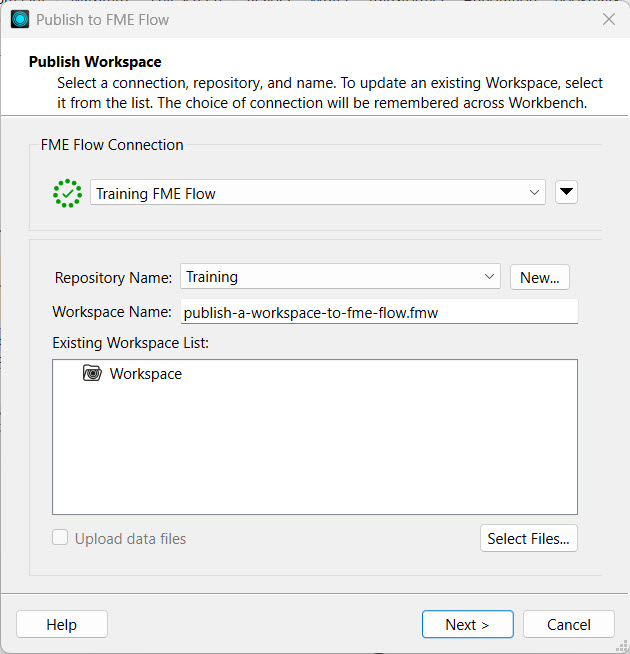
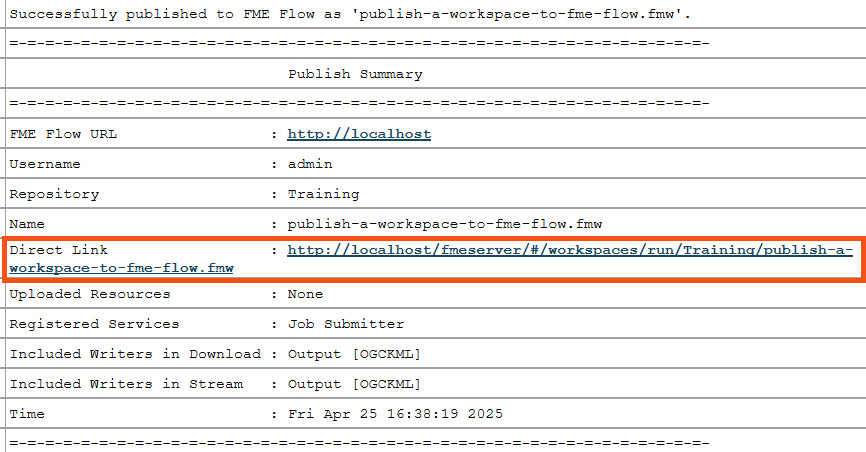
Publish the workspace to FME Flow, add it to the Training repository, name it upload-and-use-data-in-resources.fmw, and register it with the Job Submitter service.


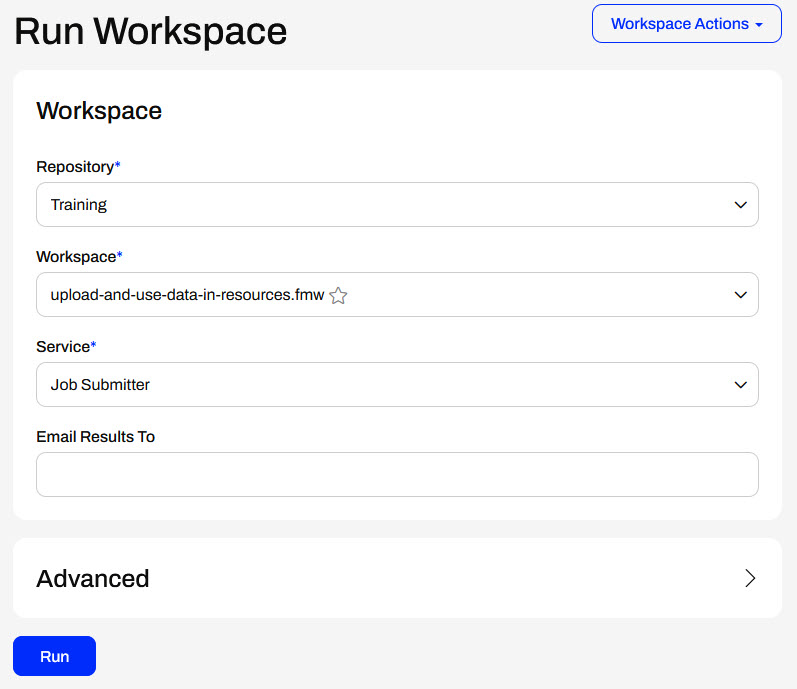
Open the Run Workspace page and select the workspace you just published. There are no user parameters to view or configure since you removed them in FME Workbench. Click Run to run the workspace, which uses the source data stored in Resources.
The workspace runs and reads the data in Resources > Data > Elections as source data. Now, you've helped Sven use three different methods to store and access source data when running workspaces on FME Flow.
You do not need to publish a workspace to upload data to the FME Flow Resources. Instead, you can upload data directly to Resources from the FME Flow web interface. It's as simple as navigating to your desired folder, selecting upload for files or a folder, and then selecting your data from the file system.
Once FME Flow finishes uploading the file, it will display the count of completed uploads at the top of the page.
In general, uploading files to Resources is very flexible. You may drag a file onto the open Resources folder page to upload. You may also select multiple files to upload at once or a folder containing numerous files. If you have access to the file system on the FME Flow server, you may also upload data directly to the Resources in the FME Flow System Share, located on Windows by default at C:\ProgramData\Safe Software\FMEFlow\resources.
The data you upload to Resources is available to all workspaces and users with permission to access Resources when running workspaces. For example, you use the VancouverNeighborhoods.kml file as source data for multiple workflows, and you only need to store one copy of the file in Resources for multiple workspaces to use.
FME Flow can connect to network-based file locations and Amazon S3 file systems via Resource Connections. You create Resource Connections directly from the Resources page on FME Flow.
The FME Flow Service Account needs full permissions to network-based resource drives to access, read, and write to the drive so that FME Flow can connect to and use data from the location successfully. Once you grant permissions to the service account, mapping FME Flow to the network-shared file location is as easy as entering the UNC path to the location.
Once you create a Resource Connection, FME Flow displays it on the Resources page.
You may also access the Resource Connection's properties like any other Resource item. The System Path is especially useful for referencing the Resource Connection location from workspaces as a parameter.
To create an Amazon S3 Resource Connection, you need to enter the bucket name and valid access and secret keys for the S3 location.
Unlike network-based resource systems, you cannot access Amazon S3 Resource Connections from workspaces as a data source or destination using the system path parameter. You must use an S3-related transformer, connector, or URL to access the data stored in the S3 bucket.
Using the FME Flow web interface, selecting data from Resources at run-time is simple with user parameters. However, in some cases, you may want to read data from Resources without the end-user having to select it, or restrict the end-user from selecting alternate source data. You accomplish this using FME Flow parameters, specifically the FME_SHAREDRESOURCE_DATA parameter, which references the Data folder in Resources.
When authoring a workspace to read data from Resources without using a user parameter, you must reference FME_SHAREDRESOURCE_DATA directly in the source file parameter.
Remember that the Flow parameter FME_SHAREDRESOURCE_DATA includes the Data folder in its path. For example, the source KML file value is FME_SHAREDRESOURCE_DATA\Boundaries\VancouverNeighborhoods.kml not FME_SHAREDRESOURCE_DATA\Data\Boundaries\VancouverNeighborhoods.kml. The easiest way to find the entire path to a Resources dataset is inspecting it's properties on FME Flow and copying the path into the workspace reader parameter.
If you want to prevent end users from altering the source dataset on FME Flow, you must also remove the user parameter for the source file in FME Workbench.
The $(FME_SHAREDRESOURCE_DATA) parameter will fail on FME Workbench unless you set the parameter value to the file server location of the FME Flow System Share. Oftentimes, FME Workbench and FME Flow are not installed on the same machines so FME Workbench cannot directly access the location.
Sven continues with his previous workspace. He wants to store the source data files in FME Flow Resources for storage efficiency and data accessibility across multiple workspaces. However, he just received an updated GML file of voting locations and needs to upload it to Resources. Sven also wants to restrict end users running this workspace from altering the input source files, so he wants to remove the source file user parameter and link directly to the Resources data in the workspace.
For this exercise, follow these steps to help Sven upload the new data and adjust his workspace to use only the Resources data.
Navigate to Resources> Data > Elections. Here, you will upload the updated GML file of voting locations. Click Upload and select Files.
Use the file explorer to navigate to the NewElectionVoting.gml file (C:\FMEData\Data\Elections\NewElectionVoting.gml) and select it for upload to Resources.
FME Flow adds the NewElectionVoting.gml to the folder, which is ready to use as source data for workspaces.
Return to FME Workbench and open the starting workspace (C:\FMEData\Workspaces\DeployWorkflowsWithFMEFlow\upload-and-use-data-in-resources.fmw).
This is the same starting workspace as the previous lesson, Publish Data to FME Flow Resources. If you already have the workspace open in FME Workbench, you can continue working with it.
The workspace has two user parameters that take source files as input for the KML and GML readers. Sven doesn't want end users to be able to alter the workspace's source data anymore, so you will remove both user parameters. In the Navigator, expand User Parameters, right-click each parameter, and delete it.
FME Workbench no longer links each source file reader parameter to a user parameter.
Return to the Resource > Data > Elections folder on FME Flow. Select the VancouverNeighborhoods.kml file, open the Actions menu, and select Properties.
Copy the System Path and click Close.
Return to FME Workbench and edit the Source Google KML File or URL parameter for the VancouverNeighborhoods reader. Paste the System Path value for the KML file.
Repeat the same steps to reference the NewElectionsVoting.gml file in the Elections folder. Return to FME Flow, get the System Path for the NewElectionsVoting.gml file, and add it to the Source GML File parameter.
Both source files link to the files stored in Resources > Data > Elections on FME Flow. The $(FME_SHAREDRESOURCE_DATA) parameter denotes this. Neither source file connects to a user parameter, so the end user cannot alter the source file values on FME Flow.
Publish the workspace to FME Flow, add it to the Training repository, name it upload-and-use-data-in-resources.fmw, and register it with the Job Submitter service.
Open the Run Workspace page and select the workspace you just published. There are no user parameters to view or configure since you removed them in FME Workbench. Click Run to run the workspace, which uses the source data stored in Resources.
The workspace runs and reads the data in Resources > Data > Elections as source data. Now, you've helped Sven use three different methods to store and access source data when running workspaces on FME Flow.
